Tuesday, October 29, 2013

Happy Halloween!

Even if I don't have any orders...
I just can't seem to let a holiday go by without making some cookies.
My "littles" that I watch during the day are always happy to be my taste testers!
Snack-time rolls around and even the littlest ones will say, "Cookie?!?"
They've come to expect Ms. Melody's cookies, LOL!
I didn't go all out fancy with this batch.
I knew they weren't for an order, so there weren't any "expectations".
I just had fun and added lots of sanding sugar, jimmies, and sprinkles.
The "littles" prefer FUN over FANCY anyway!
And although I do have an appreciation for cookie art...when I'm EATING a cookie, the good old fashioned frosted ones with sprinkles are by far my favorite!

Saturday, October 26, 2013

Teenage Mutant Ninja Turtle Cake...

I did this cake for the 5th birthday of a little guy last week.

My son's are teenagers now, so it's been a long time since I've been around TMNTs.
I had to do some research and ask a lot of questions regarding colors, names, weapons of each turtle, LOL!  But it was a really fun cake to do.  

I created a frozen buttercream transfer for the turtle.  I don't know why, but FBT always scare me.  Maybe it stems from the first time I ever attempted one.  Years ago, I decided to try my first FBT.  I was making my husband's birthday cake and because he is a Detroit Lions fan, I decided to create a FBT of the logo for his cake.  Well, it LOOKED awesome...ON THE WAX PAPER.  However, when I went to peel it OFF the wax paper and place it on the cake, it became a crumbled mess.  After speaking with a friend and fellow baker, she explained that I made it way too thin.  That was the problem.  I have since learned just how thick they have to be (VERY).  Ever since I started creating them thicker (and adding a layer of plain icing over the back), I have had nothing but success with them!  Yay!  The reveal is always so much fun (and a little nerve-wracking).  But when you see your image come off that wax paper and come alive...it's such a neat feeling!

I did this cake in french vanilla cake and a classic butterceam icing.
I enjoy doing sheet cakes.  I know sculpted cakes and huge tiered cakes are all the rage right now.  But when I'm "eating" cake, there's nothing better than a great moist sheet cake with some good 'ol fashion homemade buttercream.  
Yum-O!
Happy birthday Corbin!
I hope you enjoyed your cake!

Monday, October 21, 2013

Homemade (NUT-FREE) Granola Bars...(And The Story Of An Unknown Peanut Allergy)

 I started this blog to share my cake and cookie decorating journey...but as time has gone by, I've started enjoying sharing some of my favorite recipes with you as well.
 This recipe is the result of a personal story within our family.

I don't usually share too much about my family on my baking blog, I save that for my personal family blog...but there's a story behind these granola bars.
My oldest son has always struggled with severe eczema and hives and after 17 years (and no relief), someone suggested allergy testing to see if his eczema and hives were food related.  Well, we went through allergy testing and unfortunately none of the answers we received helped his eczema and hives, HOWEVER...we found out that he is allergic to peanuts, Brazil nuts, and pistachios.  He has eaten peanuts and peanut butter his entire life and never had an allergic reaction.  But our allergist said that just because he hasn't had a reaction YET, doesn't mean he won't ever get one.  So we are now to avoid peanuts and keep an Epi-Pen in our home.  Try telling a teenager, who's never had a problem eating peanuts his whole life, that now he can't have them.  He's not very happy about it...but he humors me.  I told him, "I know you've never had a reaction, but that doesn't mean you won't some day, and I couldn't bear living with myself if I allowed you to have peanuts and something happened to you."  

When he requested granola bars at the store the other day and I found out that most of them DO either HAVE peanuts/tree nuts or are made in a facility that does have them...it scared me a little.  SO...I thought, "How hard could it be to make homemade granola bars?"  So I came home and did a little research online.  By finding various recipes online, I added and subtracted ingredients and came up with one that suited our family's needs.  So, if you or someone you know has a nut allergy, you can make your own homemade granola bars and not miss out!  I have to say, these are pretty good too!  Even my teenage son (whom is very picky) gave them his stamp of approval.   Feel free to edit them to fit your family's needs or tastes.  If you like them crunchier, add less honey/oil.  If you like them chewier, add more honey/oil.  If you like fruit, try raisins, dried cranberries, dried cherries, or dried blueberries!  You could do a S'mores version by adding mini marshmallows!  The possibilities are endless!  I'm not one of those people who gets all bent out of shape over people doing what they want with my recipes.  
Share it, change it, do what you want!
Most of all enjoy it!
Ingredients:
2 1/2 c. quick oats
1/2 c. crisp rice cereal
1/2 c. mini semi-sweet chocolate chips
1/2 c. brown sugar
1/2 tsp. salt
1/2 c. canola or vegetable oil
1/4 c. honey
1/2 tsp. vanilla
Mix all ingredients, except the chocolate chips, together.  Stir well, incorporating wet and dry ingredients.  Take your time and let the dry ingredients really soaks up the wet ingredients.  Once it is thoroughly mixed, add chocolate chips.
Spray a 9X13 pan with non-stick cooking spray.
Spread mixture into pan.
Bake at 350 degrees for 20 minutes or until golden brown.
Allow to cool.  This part takes some time.  It must be thoroughly cooled, as this allows the granola to firm up.  If you cut it too soon, depending on how dry/moist you made it...you could end up with a dry crumbly mess, or a moist sticky glob.  WAIT until the bars firm up...it will be worth it!  I promise!
Once thoroughly cool, cut into squares or bars and enjoy!

Wednesday, October 16, 2013

Mirror Cookies...

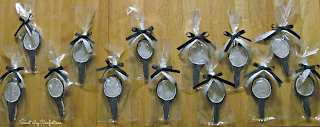
 These cookies were a lot of fun to do.
When I got the request for mirror cookies for a spa themed bridal luncheon, I knew immediately that I wanted to do them!
 The only challenge I had was...
I didn't have a mirror cookie cutter.
No problem.  I've hand-cut many cookies before.
So I went searching online for a pattern.
Who knew it would be so difficult to find the perfect mirror!
I knew exactly in my head what I wanted...I just couldn't find the pattern online.
But alas, I found this simple little vintage/decorative mirror.
It's a little hard to make out any details because I did it in such a deep shade of navy.
I added some swirls and dots, trimmed it in pearl dragees.
I used Color Mist to give the "glass" of the mirror a little extra sheen.
They turned out to be a little more challenging than I expected, but fun none the less!
I had some extra fun in packaging these.
I always heat-seal my cookies in plastic bags and will usually add some paper gift-curling ribbon.  But the colors of the wedding struck me as so beautiful (navy and silver) that I wanted to go the extra mile and do something a little special.
I got some heavy duty metallic sparkly silver ribbon and then some taffeta navy ribbon and did a double bow.  I think they turned out really cute.
Congratulations to the bride and groom!


Friday, October 11, 2013

"Cute As A Button"...A First Birthday Party...

 Could there be anything more cute than "Cute As A Button" for a first birthday party?
I think not.
 I was asked to do these button cookies for the button themed party for little Ellie's birthday.
I couldn't resist including a surprise birthday cupcake cookie for the birthday girl!
 I love this color scheme.
I was given a sample invitation to go on and I think this color palette is absolutely adorable for a little one's birthday party!
 You know that I just "have" to pick at least one thing on all of my creations that bother me...
And with this one, I was disappointed that all of the cookies didn't turn out perfectly round and that all of the button holes weren't uniform.
Until...
 A friend told me, "I think their lack of uniformity is what makes them look whimsical and cute! I thought you did that on purpose!"
 Ok...now I feel better, haha!
Yes, I have to agree with her.
It DOES make them look rather whimsical and cute not being perfectly uniform!
 I love doing themes like these.
When someone gives a request for "character" cookies...there is such pressure to make the character look EXACTLY a certain way.  When given a theme like this, it gives me more freedom to be creative!
I had a blast doing this project and think they turned out really cute.
It was a pleasure to work with my customer Cindy.
Happy birthday little Ellie!


Wednesday, October 9, 2013

Halloween Candy!

 These have to be some of my favorite cookies to make!
CANDY CORN and CANDY PIECES!
The colors themselves just POP and scream autumn, don't ya think?
 I added a touch of sanding sugar to the edges of the candy corn.
I just love the look and also the bit of "crunch" sanding sugar adds to sugar cookies!

 These candy pieces were fun to make too.
I added some sprinkles to the center because...
SPRINKLES MAKE EVERYTHING BETTER!

 Aren't they festive?
I'll be squeezing in a few more Halloween goodies before the holiday.
Be watching for more goodies to come!


MSBOA Band Competition Cookies 2013

 This year is my oldest son's senior of high school.
He's been in the marching band all four years of high school.
And although we'll be doing it all over again with his younger brother in a couple years, I'm still sad to see it come to a close for Evan.  It's as they say, "Time sure does fly when you're having fun!"  I have loved watching my son go through his school years.  Through all the ups and downs...he's done it...SENIOR YEAR!
 Each year for the MSBOA competition, our school has hosted the competition.
We have supplied the judges with a meal.
I have brought the dessert for the last two years.
What could be better than the MSBOA logo and some band instruments!
I knew I had to buy these band cookie cutters when I came across them, seeing as how BOTH of my boys are in the marching band!
 The piping on this logo cookie was KILLER.
I wouldn't say it's "identical"...but it's pretty stinkin' close!
These were a lot of fun to do.
I hope the judges enjoyed eating them as much as I enjoyed making them!
P.S.  Oh...and for the record...we got a DIVISION 1 RATING in the competition!  Woot Woot!  Gotta toot our own horn, don't we? Haha!


Friday, October 4, 2013

Big Changes At Sweet Ivy Confections...My New Mission


Change.
Most people who REALLY know me personally will tell you that I HATE change.
It's uncomfortable.
It's difficult.
It's not familiar.
I'd much rather have comfort, ease, and familiar!
But lately, I have been restless in my baking venture.
For two years, I've been learning new skills and growing in my knowledge of cake and cookie decorating.  I have sold some of my work to friends, neighbors, work clients, acquaintances, etc...yet I've still remained...restless and unfulfilled.
I thought and thought, prayed, and thought some more.
I have come to the decision that I'd like to take my baking in a new direction.
I am no longer going to bake for profit (not there was ever much profit involved before).
I had one of those "a-ha moments" last night.
I did some soul-searching and wanted to give back, bless others, and most of all please God in what I do.  I already work a full time job outside of the home in a different field...and I've decided I "ENJOY" baking too much and want to STRICTLY keep it FUN and a HOBBY for myself.  When I was charging a specified rate for cakes or cookies for people, I felt an enormous amount of stress to be perfect.  I cannot do that anymore...because I'm NOT perfect.  I enjoy baking/decorating...I feel God put that passion in my heart...and I want to continue to develop my skills...BUT...I am not going to "make money on it".
You may ask...
Are you going to bake for FREE?
YES I AM!!!
You heard me right!
I am not going to charge for my time and skill going into the cakes and cookies I make.
But what I ask from you, is that you bless someone in return.
Here's what I will be doing...
When I give you an estimate for your dessert...
You will be paying for the cost of your ingredients and then a set donation of your given estimate will go toward missions and charity. 
Since I decided to do this, the pressure and stress to be "perfect" has already lifted off of me.  I want customers to understand that I bake for fun, a creative outlet, a hobby. 
I am excited about changing the direction of Sweet Ivy Confections.
Because God has abundantly blessed my family, I would much rather give my time and talent for free to bless someone else in need.
The stress for perfection has left me.  I feel at peace and I'm excited to bless others while I develop my baking skills!
...It is more blessed to give than to receive.  Acts 20:35